How to Take Professional Headshots at Home: A Photographer's Guide
Why Professional Headshots at Home Make Perfect Sense
Let me guess: you just got quoted $500 for a single headshot, and you're wondering if there's a better way. Or maybe you need updated LinkedIn photos by tomorrow, and your photographer is booked solid. I get it. As a professional headshot photographer here in the Twin Cities with Excalibur Portraits, I've heard every version of "I need a headshot yesterday, and I'm on a budget."
Here's the truth I tell all my clients in Minneapolis and St. Paul: understanding lighting and composition matters infinitely more than expensive equipment. Yes, professional photographers have advantages—high-end cameras, studio lighting, years of experience getting expressiins that look real. But if you're willing to learn some fundamental techniques, you can absolutely take your own headshot that looks polished and professional.
I'm about to share some insider industry knowledge that we professionals use every single day. These are the same principles I apply whether I’m photographing a Fortune 500 executive or an aspiring actor. Will your DIY headshot be identical to what you'd get in my studio? Probably not. But will it be 100 times better than that selfie you took in your bathroom? Absolutely.
What Makes Actor and Executive Headshots Different (But Actually the Same)
Understanding Professional Headshot Photography Fundamentals
Before we dive into DIY headshots, let's talk about what makes a headshot actually "professional." Whether you're an actor auditioning for a role or an executive updating your company website, every great headshot rests on three pillars: lighting quality, composition, and expression.
Corporate headshots and LinkedIn profile photos tend toward conservative—think solid backgrounds, professional attire, confident but approachable expressions. Actor headshots and modeling portfolios allow more personality and variety, often with more casual wardrobe choices and dynamic expressions. But here's what both share: flattering light that sculpts the face, thoughtful composition that draws attention to the eyes, and an authentic expression that communicates competence and approachability.
The psychology behind headshot photography tips is fascinating. Your headshot needs to answer three questions in under two seconds: Can I trust this person? Are they competent? Would I want to work with them? That's a lot of pressure on one image, which is why getting the fundamentals right matters so much.
Common DIY Headshot Mistakes to Avoid
The mistakes I see most often? Harsh overhead lighting that creates unflattering shadows, distracting backgrounds that pull focus from the face, stiff expressions that scream "I'm uncomfortable," and standing too close to the camera, which distorts facial features. We're going to fix all of that.
Set Up Your Home Headshot Studio
Choosing the Best Location for DIY Headshots
Window light is your best friend. I'm going to let you in on a secret: some of the most beautiful portraits I've ever seen were shot with nothing but a large window. You're looking for a room with a big window that doesn't get direct sunlight blasting through it.
North-facing windows are gold because they provide consistent, soft light throughout the day. If you don't have a north-facing window, no problem—just shoot during times when direct sun isn't streaming through. Early morning or late afternoon works beautifully, giving you that flattering golden hour quality without needing to wake up at dawn.
Creating the Perfect Background for Professional Headshots at Home
Here's the six-foot rule that will transform your images: position yourself at least six feet away from your background. This creates that beautiful soft blur that sparates your face from the background and makes it the star of the show. Distance turns a cluttered bookshelf into a soft, professional-looking backdrop.
Color psychology matters more than you think. Neutral tones—grays, soft blues, warm beiges—keep attention on your face. Avoid busy patterns or anything that clashes with your skin tone or outfit. A plain wall works perfectly. If your walls are a bit dingy, hang a bed sheet.
Essential Equipment for Taking Your Own Headshot
Quick Reference Equipment List:
Smartphone with portrait mode OR basic digital camera
Tripod, a friend, or a stable surface (stack of books works in a pinch)
White poster board, aluminum foil, or actual reflector ($15 on Amazon)
Diffusion material: white shower curtain or sheer white sheet
Timer app or remote shutter or friend
That's it. Seriously. You probably have most of this already. You could add a basic ring light to supplement window light, and an inexpensive Bluetooth shutter remote saves you from doing the awkward run-and-pose dash.
DIY Headshot Lighting Tips: Your Secret Weapon
Why Window Light Creates Professional-Quality Results
Let me tell you why window light is as close as you can get to my $3,000 studio lights: it's soft, flattering, and incredibly forgiving. Large light sources create soft shadows, and a big window acts like a massive softbox. The quality is genuinely beautiful, which is why natural light headshots are popular among Minnesota professionals who want to avoid loading up on gear.
The 45-Degree Rule and Rembrandt Lighting Explained Simply
Position yourself so the window is roughly 45 degrees to your side—imagine you're standing at the center of a clock face, looking at 12, and the window is at 10 or 2 o'clock. This creates what we call Rembrandt lighting, named after the painter who loved dramatic, sculptural light.
You'll know you've got it right when you see a small triangle of light on the cheek opposite the window. This lighting pattern is universally flattering because it adds dimension to the face without being too dramatic. It's the lighting I use for probably 70% of the headshots I shoot at Excalibur Portraits.
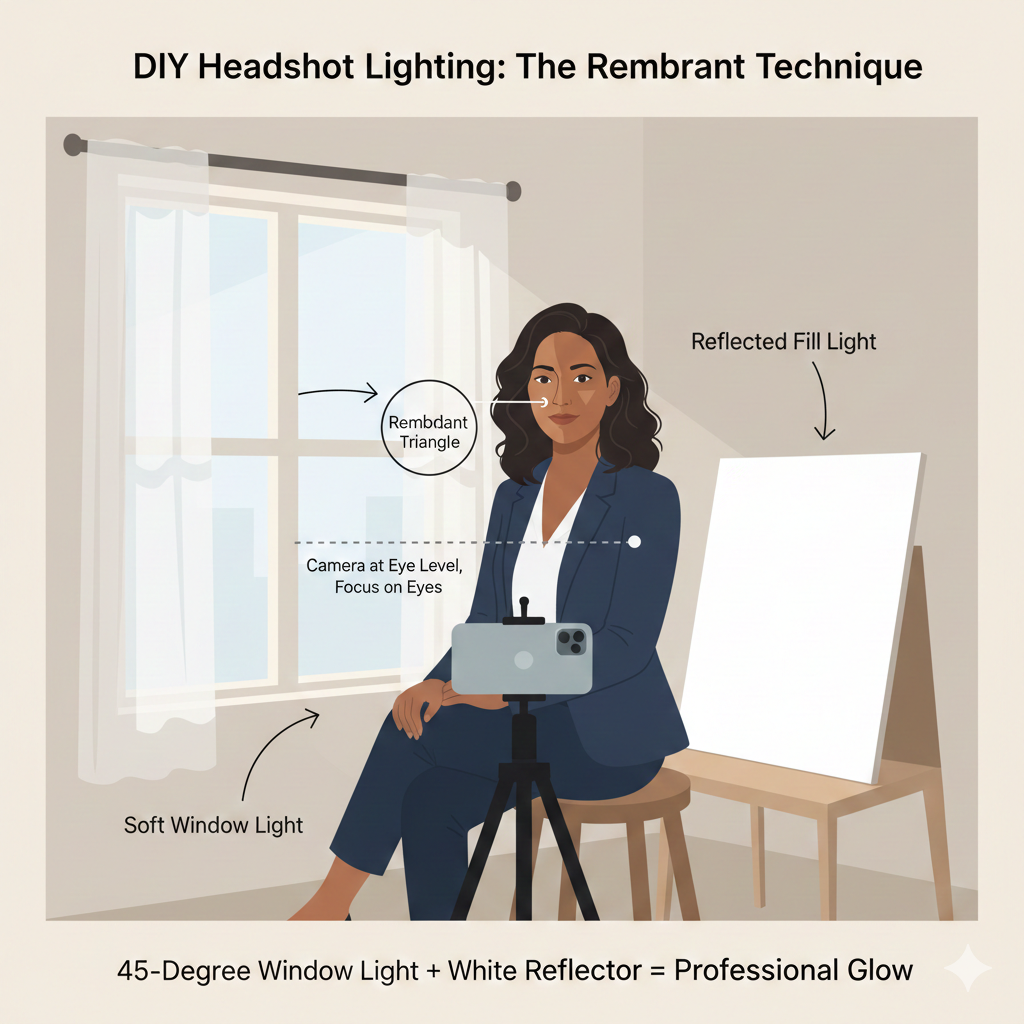
If the body is facing 12 o’clock, the window is at 10 or 2, and the reflector is opposite.
Using Reflectors and Household Items
That white poster board I mentioned? Position it on the opposite side from the window to bounce light back into the shadows. This is called "fill light," and it's the difference between dramatic-but-too-dark and perfectly balanced. Hold it at about chest height, angled up toward your face.
No poster board? Aluminum foil wrapped around cardboard works (shiny side out for more punch, crinkled for softer fill). A white bedsheet draped over a chair. Even a white wall can serve as a reflector if you position yourself correctly. Here’s some of that insider knowledge I promised…. I have even used the sun reflectors that you put in a car’s windshield because they are cheap, easy, and have multiple uses.
Troubleshooting Common Lighting Problems
If you're getting harsh shadows under your eyes, your light source is too high—lower your chair or find a different window. If your face looks flat and boring, you need more directional light—move further from the window or remove some of that fill light. Mixed color temperatures (when your face looks weirdly orange or blue) happen when you're combining window light with indoor lights—turn off all overhead lights and lamps.
Quick Win: The smartphone flashlight trick for fill light works surprisingly well. Have your friend hold their phone at waist level, flashlight on but covered with a white napkin or tissue, pointed up at your face. It's like a tiny, portable studio light, and it's saved many an emergency headshot.
Camera Settings and Positioning for Taking Your Own Headshot
Smartphone Camera Settings for Professional Results
If you're using your phone, switch to portrait mode—it mimics the soft background blur of professional cameras. Tap on your face to lock exposure and focus on your eyes (more on why in a second). Turn on the grid lines in your camera settings; they'll help with composition and keeping everything level. Nobody wants a tilted horizon behind their head.
Basic Camera Settings That Make a Difference
For those with actual cameras, put it in aperture priority mode (usually marked "A" or "Av" on the dial). Set your aperture to f/4. This gives you sharp eyes and a softly blurred background—the perfect balance for headshot photography tips. Your camera will handle the rest automatically.
Distance and Focal Length: The Six-Foot Rule
Position your camera about six feet from the tip of your nose. This is crucial. Too close, and your nose looks huge and your ears tiny (thanks, lens distortion). Too far, and you will begin to lose the blur of the background that is so dreamy and wonderful. If you're using a camera with interchangeable lenses, something around 90mm is ideal.
Camera Height and Composition Guidelines
Your camera lens should be right around chin level and aimed slightly upward toward the eyes. Shooting slightly upward gently mimics the Hollywood superhero shot where the camera is at ground level aimed up to create a sense of admiration.
For ideal composition, frame from the top of your head to just below your collarbone. This is the sweet spot for headshots—tight enough to see your expression clearly in that small circle on LinkedIn, loose enough to not feel claustrophobic.
The Non-Negotiable Rule: Focus on the Eyes
Focus on the eyes. Not the nose, not the forehead, the eyes. Specifically, focus on the eye closest to the camera. If your eyes aren't sharp, the photo fails, period. This is the one rule I never compromise on, whether I'm shooting professional headshots at home or in my Minneapolis studio.
Directing Yourself for Natural, Professional Expression
Body Positioning for Headshots
Here's some relief: focusing on the head and shoulders eliminates all that awkwardness about what to do with your body. But your shoulders still matter. Position your body at a 30-degree angle to the camera—not straight on (too mugshot-y), not full profile (too editorial).
This simple angle creates visual interest and looks infinitely more professional than squared-up shoulders. It also slims the appearance of your frame in photos, which most people appreciate.
Mastering Facial Expressions and the "Smize"
You've heard of "smize"—smiling with your eyes (Thanks Tyra!)? It's real, and it works. Think of something that makes you genuinely happy right before the shutter clicks. Your eyes will engage naturally. The difference between a real smile and a forced "say cheese" smile is visible from across the room.
For professional headshots, you don't need a huge grin. A subtle, confident expression with engaged eyes often works better than showing all your teeth. Practice in a mirror until you find your sweet spot.
Why Professional Photographers Take 50+ Shots
Ask me why I shoot hundreds of frames for customers who are only purchasing 4 or 5 images. Because expressions change, eyes close mid-blink, one angle works better than another, and sometimes magic happens on frame 73 that didn't happen on frame 12. Give yourself the same advantage. Set your camera to burst mode and take tons of shots. You only need one perfect frame.
Post-Processing: Polishing Your DIY Headshot
Free Editing Tools Worth Using
Snapseed (mobile), Lightroom Mobile (free version), and GIMP (desktop) are professional-quality editing tools that cost exactly zero dollars. They're powerful enough for retouching headshots but intuitive enough for beginners.
The Subtle Enhancement Approach
The goal of editing is to enhance, not transform. Adjust exposure if your image is too dark or bright. Add a touch of contrast to make your image pop. Increase clarity slightly to sharpen details—but go easy, or you'll look like an overly processed AI headshot.
Retouching: The Professional Approach
Here's the rule: maintain texture while eliminating distractions. We all have blemishes, temporary redness, or that one stubborn chin zit that showed up for your photo shoot. Remove those. But don't blur your skin into oblivion. You should still see pores and natural skin texture. If your skin looks like a Cabbage Patch Doll, you've gone too far.
Let me save you some frustration by telling you to just let your stray hairs be stray. Stray hairs are where I spend the bulk of editing time for most clients. Sadly, even the best AI editing programs have yet to master the skill of hair retouching, so this remains a one-by-one, done by hand approach. Do your best to tame them before taking photos, but those that inevitably remain you must be content with.
Color Correction Basics
Remove color casts by adjusting white balance—if your photo looks too orange, cool it down; too blue, warm it up. Enhance skin tones slightly by adding warmth to the orange/red channels. Brighten the whites of your eyes subtly. Sharpen the eyes to make them pop.
What NOT to Do
Avoid the over-filtered Instagram look. Those smoothing filters, dramatic color grades, and heavy-handed effects scream "amateur hour" on professional platforms like LinkedIn. If someone wouldn't recognize you when you walk into an interview based on your headshot, you've edited too much.
Frequently Asked Questions About DIY Headshots
What should I wear for a professional headshot at home? Solid colors work best—avoid busy patterns, logos, or anything too trendy. Jewel tones (navy, burgundy, emerald) photograph beautifully. Dress slightly more formally than your day-to-day work attire.
Can I really take professional-looking headshots with just my iPhone? Absolutely. Modern smartphone cameras are remarkably capable. The newest iPhones and Android flagships have excellent portrait modes that create professional-looking depth of field.
How do I know if my DIY headshot is good enough for professional use? Show it to three trusted friends. If they say "wow, that looks professional," you're good. If they hesitate or say "it's nice," you might want to try again or book a professional session.
When should I invest in a professional headshot photographer instead? If you're job hunting at the executive level, building your personal brand as a thought leader, or need headshots for high-stakes professional purposes (acting, public speaking, board positions), the ROI on a professional session is absolutely worth it. For routine updates or general professional presence, DIY can work great.
Your Next Steps to Professional Headshots at Home
Here's what I want you to remember: professional results come from understanding light and composition first, equipment second. The gear enhances your results, but knowledge creates them. Everything I've shared comes from years of photographing thousands of clients here in the Twin Cities, and these fundamentals work whether you're in a high-end studio or your living room.
Give yourself permission to experiment. Take 100 photos. Try different angles, expressions, and lighting setups. Delete 99 of them if you need to. The practice itself will teach you more than any blog post can.
Ready to take your first professional headshot today? Set aside an hour (yes the full hour) this weekend, find that perfect window, and give it a shot. You might surprise yourself with the results.
And if this sounds like more of a time investment than you're ready for—or you realize halfway through that you'd rather leave it to someone who does this every single day—I'd love to help. Book a session with Excalibur Portraits, and let's create headshots that truly represent the professional you are. We make the process easy, efficient, and dare I say, even fun.
Either way, you've got this. Now go make some headshot magic happen.
By Dan Mutterer, Minneapolis Headshot Photographer | Excalibur Portraits has been the Twin Cities' premier headshot photography studio since 2010. Serving Minneapolis, St. Paul, and the greater Minnesota area, Dan specializes in professional headshots for executives, actors, and LinkedIn profiles. When you're ready for studio-quality results, find your Minneapolis headshot photographer near me at ExcaliburPortraits.com.